In honor of my trip to Alaska I am posting a series of traveling tips for you and your little ones! I work for an airline so traveling with children is something I am a near expert on as my son has been on planes pretty much his whole life!
The most important thing is keeping your kids entertained. JetBlue is the perfect airline for the older kids because every single seat has it's own TV and it's completely FREE! However, my 10 month old doesn't wear headphones yet so it's not realistic to think the televisions would entertain him.
Instead, I pack some of his favorite foods and when he starts to get fussy I pull down the tray and put the foods there. It will usually entertain him for awhile and when he's done he likes to play with the tray itself.
If your child is anything like mine, it's also near impossible to get them to sleep on a big plane with lots of people and things going on, so I always pack a blanket or large sweatshirt. I put this over both myself and him and usually, once it's dark and he's not distracted by everything else, he falls asleep.
A pacifier is always good to have on hand for take-off, or some hard candy for toddlers, gum for older kids, to alleviate pain when ears are popping.
When it comes to TSA guidelines, you are welcome to bring formula/breast milk, bottled water, juice, and of course baby food/ solid foods, and any necessary medicines through security. Try to mark these separately and pull them out of your bag in a separate bin in case the agents need to check them. If your containers are 3 oz. or less, they shouldn't need to be checked.
Check the airlines baggage policy. When you travel with children, JetBlue allows an additional carry-on item such as a diaper bag, so you don't need to stuff all of your things, as well as baby's in one bag. Carseats and strollers don't count against your checked baggage, and you can gate-check any of these items.
You can purchase a seat for your little one but it gets expensive. Instead, if you are traveling with someone else, and the plane is 3 seats across, assign your seats to the aisle and the window. Most likely the middle seat will stay empty and you can probably set your child (car seat required!) in the empty seat.
If you are traveling on your own (as is often the case for me) instead of lugging the car seat all around the airport, opt for a baby sling or infant carrier. I love my Baby Bjorn that I got off of a site similar to CraigsList. Take it out for some practice walks first though as every baby has a different preference to carrier style.
And the last and final tip for traveling on a plane with children is Never be afraid to ask for help! Most airlines allow you to call in advance and request a "Meet And Assist" which will entitle either the person dropping you off at the airport to get a gate pass to help you and your younging to the plane, or they will have airport staff assist you if you are on your own, both on and off the aircraft.
I hope these tips are helpful for you! Happy traveling!

Monday, August 23, 2010
Friday, August 20, 2010
Cute Maternity Shirt Tutorial
Even if you're not expecting, you can adapt this to make a cute tunic. Who doesn't want to hide a few pounds? I know I do....
ANYWAY! Cute tutorial taken from imakestuff4fun (link will take you there)
Finished product:
Very cute, huh?
ANYWAY! Cute tutorial taken from imakestuff4fun (link will take you there)
Finished product:
Very cute, huh?
Thursday, August 19, 2010
Alphabet Beanbags From Old Clothes
I am so excited about today's tutorial I am skipping the auto post and posting it TODAY!! YAY! I plan on making these for my little one (probably will be abirthday present...)
I have stumbled upon a gem of a blog it's DollarStoreCrafts.com
See if we can follow this now, today's tutorial was posted on Dollar Store Crafts but originally from Notes From a Very Red Kitchen (which by the way, is also a great blog!) and now it's being posted here. Or at least we are posting a link to it here...
Alphabet Bean Bags from old T-shirts and fabric scraps!! AWESOME!
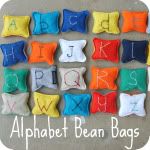
Here it is. Enjoy!
A little tip here i would like to throw in, if you are like me and have a die-cut machine (I have a Pazzles and LOVE it!) instead of using your sewing machine to make the letters, you can also cut-out the letters in fabric on your machine and use a strong adhesive to put it on the beanbags.
I have stumbled upon a gem of a blog it's DollarStoreCrafts.com
See if we can follow this now, today's tutorial was posted on Dollar Store Crafts but originally from Notes From a Very Red Kitchen (which by the way, is also a great blog!) and now it's being posted here. Or at least we are posting a link to it here...
Alphabet Bean Bags from old T-shirts and fabric scraps!! AWESOME!
Here it is. Enjoy!
A little tip here i would like to throw in, if you are like me and have a die-cut machine (I have a Pazzles and LOVE it!) instead of using your sewing machine to make the letters, you can also cut-out the letters in fabric on your machine and use a strong adhesive to put it on the beanbags.
Wednesday, August 18, 2010
DIY Diaper Caddy
This tutorial for a super cute Diaper Caddy comes from Noodlehead today.

Go check it out! I am going to make mine tonight.
Go check it out! I am going to make mine tonight.
Tuesday, August 17, 2010
Tips for Tueday- Baby's Schedule & Finger Foods
When I was a new mom, after the "newborn always sleeping" wore off, I had to figure out my baby's nap schedules. I t was really hard! Until I found an amazing article in a parenting magazine (I wish I could remember where) that said 2-6 months naps should be every 2 hours from the time the wake up from their last nap. It was a complete change! My baby was happier, went down for naps easily, and I got a break from having to hold him in order to get him to sleep.
Since I don't have the article to share I found on Baby Center a similar tool. They have parents submit their schedules, you can search them to get an idea of what works for you. Right now we are pretty similar to the "Work-At-Home Formula Feeding Mom" schedule. But find one for you depending on your child's age. Check it out here (Just scroll down to the links after the article).
And since I've decided to make today a Twofer Tuesday here is a tip about finger foods. I love finger foods because they don't require me to be sitting there feeding Thomas, and he improves his fine motor skills. Baby Center also has a great List of finger foods. If you also give your baby a spoon for himself to hold while eating, they will learn to feed themselves sooner. Thomas can bring the spoon to his mouth and eat (without making too much mess) but is still getting the hang of putting the food on the soon.
Monday, August 16, 2010
Make It Yourself Monday - Lampshade Rosettes
Today I am featuring a tutorial from Simply HandMade By Paige for a very pretty lampshade with flowers sewn on.

I love this tutorial because the flowers are sew easy to make, and you can use them for clothing, accessories, or as shown here, home decor. Very versatile and easy!
Enjoy! view tutorial
I love this tutorial because the flowers are sew easy to make, and you can use them for clothing, accessories, or as shown here, home decor. Very versatile and easy!
Enjoy! view tutorial
Friday, August 13, 2010
Keeping the House Clean With Kids - Day 5: Pencil it In (with weekly planner tutorial!)
If you plan to clean the house the same way you plan all of your other important schedules, it will be more of a priority and get done!
I am a "soft scheduler", so I like to just write down the things I need to do that day in a general order but without a specific time (aside from scheduled meetings, etc.,). But do whatever works for you.
Think about it beforehand though, then you can plan realistically. The other day I made my list of things I wanted to accomplish each day, and then put them in a realistic order. It's helped a lot! I then took that list, and made it into a very cute weekly planner (included in the end of this post).
Here is a sample of my list of daily goals:
Make Beds -this is first for obvious reasons
1 Load of Laundry
Blog & Read
Dinner- this comes next because I prepare dinner when the little one goes down for his nap. usually make it in a slow cooker so it's done by eating time.
Empty Trash
Stretch
Exercise 30 min. - All things I can do during the little ones nap
Bathroom clean-up - Done during and immediately after bath time
Clean 1 room
Home Improvement/Craft project
As you can see, I tried to list them in order of what works for my schedule throughout the day. There is no set time for each (but if you're that kind of person, do it! For example, if your kids are in school, you know there are certain times that will be easiest to clean- write it down!) they are just on paper for me to see everyday and get done!
Now the fun part! Yesterday I talked about incorporating crafts and fun things into the work. Here is something I did to get myself motivated and as a reminder of what my goals are. The best thing is I was able to use things around the house so it didn't cost me a dime.

What You'll Need:
Unused picture frame
Scrapbook paper (or fabric, wrapping paper, wallpaper, whatever you like!)
Some markers
Glue
Dry-Erase marker
How-To:
Pop out the back of the picture frame. Most have a cardboard backing of some kind, this is what you want to use to measure out the paper you will be using to go inside the frame.
Lay out your design on the board and cut it to fit the frame.
Write or print out your list of "Daily Goals" and "Weekly Goals". On my frame, I had a long list of daily ones (picture on the top right) and a shorter list of weekly goals which I placed beneath them. When you print your list out, you may choose to glue it on to a piece of colored paper that co-ordinates with your frame background.
Write or print out a small rectangle for each day of the week you want to include on your planner. You may also choose to glue these on to a cute paper.
*If you want to make a full month planner* Arrange the goals and days of the week on to the background paper accordingly and glue them in place.
You may choose to use a simple ribbon, small paper rectangles, or vinyl over the outside of the frame to section off squares for each day of the month. Adhere them to your project.
*If you want to do a weekly planner with a section for reminders* Find a cute divider which can be ribbon, a scrapbooking border, or simply a different colored paper rectangle cut-out and placed on to the background paper and arrange it near the bottom half of the frame or wherever you have chosen to place the reminders section.
Cut out an additional word rectangle that says, "Notes", "Reminders", "To-Do" you get the idea. Arrange all of the strips on to your paper background. When it looks good glue them all in to place.
You may choose to add additional embellishments or decorating on to your project at this point. For me, I added some little birds to represent me and the members of our family, a nice little reminder that accomplishing my goals for the week bless me, my home, and my family members.
Put everything together in the frame and hang on the wall. Mine is in the kitchen, where I can see and update it throughout the day.
Use your dry erase maker to write your appointments over the frame, erase when needed! Now remember the daily goals we put up? They're not just there to remind you, they're there to help you keep track! When you accomplish your daily goal, draw a line through that item for the day. At the end of the night, erase all your strike-thrus to begin again the next day and not have to re-write your list!

Subscribe to:
Posts (Atom)